Thought I might enter a competition just for kicks. This month’s MoYou contest was to represent a set of nails that remind you of love letters. You had to use MoYou London stamping plates. So many plates, so many options, and I couldn’t decide what the heck to do, so I settled for skittles and lots of colour. Pix first, words later.

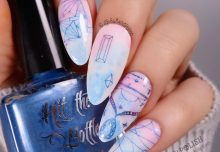
So this is the final look above. It was nice to wear. The right hand (shown on the left, cos reasons) represents an envelope – sealed with a bow (SWALK style) and coloured confetti inserts. The thumb on this hand shows a neon pink Eiffel Tower stamp. French romance and all…

The left hand (shown on the right and close up here) has sweet flowers on the ring. There’s a stamped corset on a mottled background on the middle finger, cos I’m deeming this love letter a saucy one. The index’s skull represents the “death do us part” and has some Swarovski eyes. The pinkie has a stud and gradient and some geometric patterning cos I love triangles. The thumb has the word love on a background that is supposed to be reminiscent of premium paperstock. The kind people use in creative paperwork and cool letters anyhoo.
And as requested,
TO CREATE THE LOOK ON THE PINKIE: I first created a radial gradient. I find it helps to paint your nail with the outer colour as the base. Then using a makeup sponge to create a gradient, instead of adding your polish across the face of it as you would to create linear gradients (the regular ones you see), you paint it on in circles first with the outer colour, then adding a dot in the centre with the inner colour. As per below:


Make sure there is enough polish so it is wet. I first dampen the make up sponge with water and squeeze out to keep it moist longer and less prone to pilling. I also use a latex barrier to make clean up easy, but you could always mask off your skin with scotch tape.
Sponge this on the nail as you would a regular gradient using this method. You may need to do it more than once to get a nice smooth colour blend. Once dry, stamp over with your design of choice or you can paint lines with a fine brush. Add a stud, et voila! Pinkie complete 😁
SUPPLIES USED FOR THIS NAIL ART:
Polishes:
- piCture pOlish – various!
- Doctor Lacquer – Pythagorean Theorem
- China Glaze – Flip Flop Fantasy
Other:
- Studs
- Swarovski crystals
Feel free to add me to your feed on  and connect / follow me here:
![]()
![]()
![]()
![]()