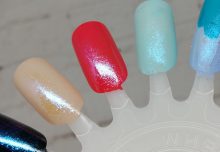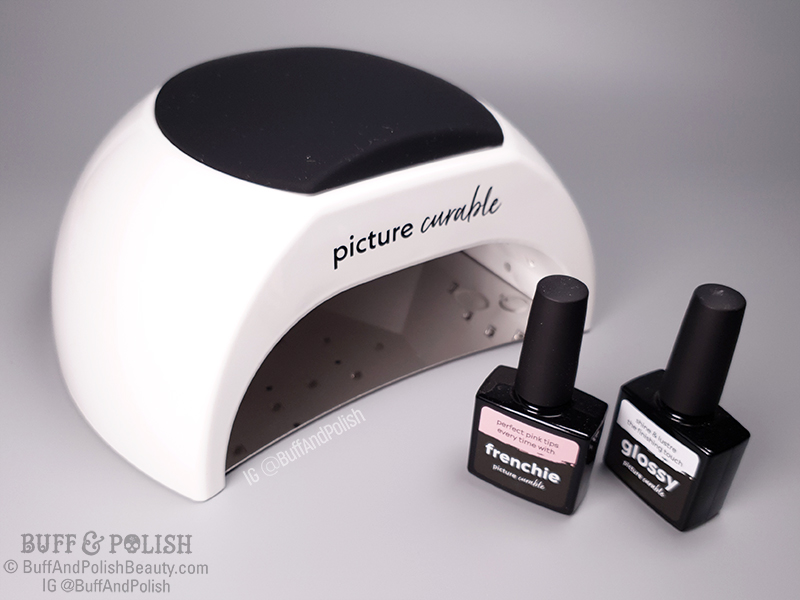
Picture Curable Lamp, Sideview with Lacquers Frenchie & Glossy
“Houston, the spaceship has landed!” The Picture Curable Spaceship, that is. Known in layman’s terms as the nail lamp that is now available to rock your long-wear polish loving world. It shall henceforth be referred to as the Spaceship, the PC Lamp, and/or the Picture Curable™ Lamp. (I considered naming it Neil, in honour of keeping up the Space theme, but that would be weird.)
I’ve been using curables and hoarding UV Nail Lamps since 2011, so I’ve come to know a thing or two, and thought a deeper look at the lamp would be great. You may wish to read this review to the unofficial theme tune of Europe’s “The Final Countdown” (– which totally would’ve been my video’s soundtrack if it weren’t for the dang copyright).
In this review I’m going be focusing solely on the actual lamp, and showing it in detail – with a video overview for kicks. Why? Because it is one piece of kit, that is as vital to the PC system as the PC Polish itself.
BEWARE: This post may be picture heavy and cause excitement. It’s also quite epic to give you a detailed overview. A review on the whole system will be coming, but let’s get acquainted, shall we?
What the? And why do I need this?
The Spaceship is the moniker given to the LED UV Nail Lamp (aka PC Lamp) that is needed to cure Picture Polish’s new system of UV Curable long-wear lacquer, known officially as Picture Curable. It may look similar to other UV nail lamps, but that’s about where it ends, because under the hood it has different specs unique to this system of curables. You need this lamp if you wish to use the Picture Curable lacquers. (And no, it will not dry regular polish faster either.)
Picture Curable Everyday Deal:
Purchase the Picture Curable Lamp plus 3+ PC colours & get 15% OFF
The PC Lamp in Detail
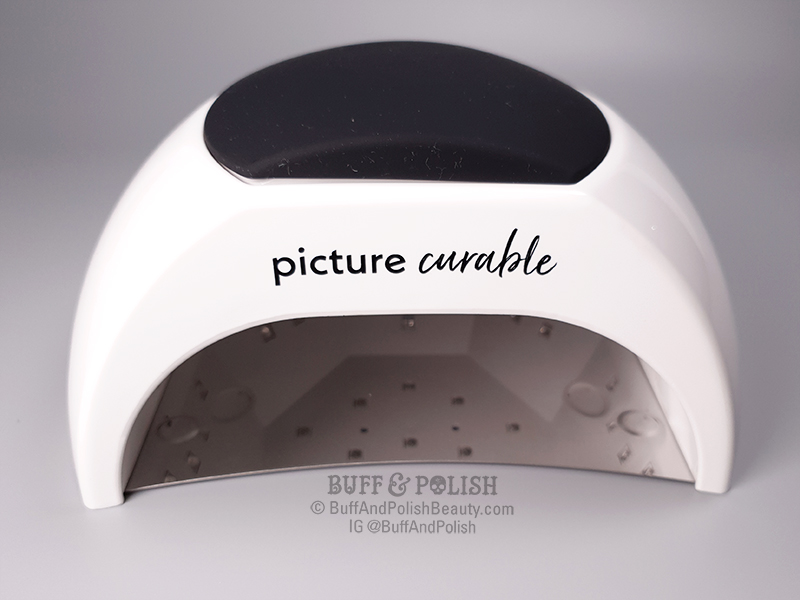
This is the lamp out of the box. Ain’t it pretty? I really do love the sleek look of the black and white. It’s so stylish, and will complement many spaces, so I’m thrilled they went with this colour scheme over anything else. It also has the PC logo printed on the front. LET US DISSECT.
INCLUSIONS/CONSTRUCTION:
The lamp itself is a high-quality ABS plastic housing with a metal base. It arrives with a power supply and easy to follow instructions. It also comes with 2 black silicone resting pads that sit on the machine. These are removable, but are very comfy to rest your wrists and hands on (especially if servicing friends or clients), so I appreciate the spare.
DIMENSIONS:
It measures about 20cm (7.9in) wide, 18cm (7in) deep and 10cm (3.9in) high. So it will fit nicely on a shelf, desk or nail table – even in smaller spaces (shoebox apartments included). It is wide enough for a full 5-finger or toes cure at a time.

The cable I received was a decent 1.5m (4.9ft) in length. The power supply is slimline so it will fit nicely into most wall sockets or powerboards without fighting for space (ugh, nothing worse than a greedy sideways power pack).
Regarding safety standards, the power supply has been independently tested and certified to Australia’s stricter safety regulations (SAA certification). This makes me glad, as I’m a stickler for electrical safety – especially with appliances. Depending on your location you will receive a local power supply or may need to use an adapter.
POWER & VOLTAGE:
This lamp is 48watts of curing magic. Which exceeds my preference of 36w minimum in a curing lamp.
Now to be clear, the strength of wattage of a lamp is NOT what cures a curable lacquer or gel, but rather the combination of the proper wavelength and correct intensity or ‘illuminance’ of the UV emitted. While related, these aren’t the same thing. (This is the main reason it’s essential you use a quality lamp that meets the curable product manufacturer’s specific requirements as this ensures a proper cure.)
Input: 110-240v, 50/60Hz, 1A
Output: DC24V, 1.5A
This product is dual voltage. This means that you will be able to use the Picture Curable Lamp pretty much straight out of the box in most locations worldwide that use anything from 110v to 240v – without the need for converters, transformers or other equipment. As an example this includes regions that are 110-120V (like USA, Canada, most of South America), 220V (Russia, much of Europe) to 230-240V (Australia, NZ, UK, much of Africa)
Essentially it’s ready to go as soon as you plug it in! Great news if you ever need to take it internationally.
BULBS & LIFE SPAN
The PC lamp comes with quality LED diodes that emit UVA at the correct wavelength to cure the PC product (395nm). Even though the UV output is minimal, it is best not to stare at the UV lights.

These bulbs (diodes) are non-replaceable, but are rated to last 50,000 hours.
Considering each manicure or pedicure should take you 8-12 minutes of curing time* and 50,000 hours equates to 3 million minutes, I’m happy to inform you that in an ideal world, you should be able to keep wearing PC well beyond 110 years old. 250,000 manis is A LOT OF MANIS – yes, even for an NPA.
*Based on 2 colour coats, and 1 (optional) top coat for each pair of hands or feet
BULB PLACEMENT
Now this had me excited. (Just me? Oh, okay.)

As you can see from the image the interior of this lamp is covered with LED diodes – 33 to be exact. In my years of using and owning all kinds of UV Nail Lamps (fluoro bulb, LED, pro and home user types) I’ve learned which elements work best in a lamp for optimum cure and functionality. Bulb placement is one important make or break feature.
The LED light placement in the PC Lamp is superb. They are spaced out to give the best coverage of UV Light for all sorts of situations. This means you’ll get a really even cure, especially those with longer nails (above 3cm) which can be hard to achieve in other generic lamps.

REMOVABLE BASE
Even Meghan Trainor knows “It’s all about that base, bout that base, bout that base…” 🎶

The Spaceship has a sturdy, stainless steel base that attaches to the unit with 4 Solid magnets. This means that it is strong enough to stay attached, yet is easily removable, and makes this UV Lamp ideal for placing over feet for perfectly polished pedicures.
I love the fact the base is made from stainless steel, as opposed to plastic. Making it much easier to clean if you happen to spill anything on it (hello polish dregs), as well as being far more durable. Though avoid do using cleaning products on the housing and LEDs, and stick to microfiber cloths.
The other bonus is that being polished steel; the base has a reflective surface. This is superior to a dull or plastic surface because it actually reflects the UV light, ensuring a better cure for underneath the nail – wrapped tips included.

You can see two divots in the base plate. These are for intuitive placement of the hand, for where you would rest the thumbs whilst curing.
AUTOMATIC SENSOR
The automatic sensor is automagic. The image shows where the sensors lie. This is what you need to put your hand/foot/appendages in front of to trigger the light to come on. If painting on tips, you can cover it with a texta (marker pen) or other object.
You’ll notice some additional buttons on the back. These are a standard feature of this lamp design. But the lamp has been tailored specifically for use with the Picture Curable Lacquer system, and is set to cure when the automatic sensor is triggered – and turn off after exactly 2 minutes.
In other words, avoid using those buttons. The settings may lower the light intensity which is not recommended for use when curing Picture Curable.
HOW IS THE PC LAMP DIFFERENT FROM A GEL POLISH LAMP?
This lamp and the PC system cures at 395nm UV light wavelength. Most gels on the market cure at 365nm (traditional gels) or 405nm (many recent gel polishes). Curable products are designed to cure at their very specific wavelength of light.
Trying to cure gels or gel polishes under the PC Lamp will not work.
Trying to cure PC Lacquer under a typical UV gel lamp (whether a fluoro tube or LED type) will not work.
Even if tempted to try either of these methods (which is a bad idea) and product may ‘appear’ cured, there is no way you can visually tell that it really is (regardless of which online bloggers argue otherwise). Product can still be uncured below the surface.
By ignoring this advice, you open yourself up to all sorts of issues like lifting, peeling, and potential overexposure issues – including allergies which are lifelong. Properly cured products do not pose a threat. So I strongly recommend you use as instructed so you can enjoy all kinds of curables indefinitely.
WILL IT HURT ME?
No. Only if you drop it on your toe from a height perhaps.
Seriously though, I wanted to address the concerns some people have about using UV lamps. Especially those new to the world of curables, as there is still a lot of misinformation floating around out there the interwebs. And sadly, inaccurate information can be damaging, even when already disproved.
UV Lamp Technology has improved so much over the years. Numerous studies have shown that the risks for skin cancer are negligible. So despite what the Dr Oz type sensationalists, or other well-meaning, but ill-informed blogging/vlogging ‘experts’ might contrarily proclaim, they usually aren’t qualified scientists. And since I always advise that you don’t automatically believe everything you read on the internet, especially when starting out, here are links to some published studies & articles to back it up. Cos science, yo! LINKS: One, Two, Three, Four.

ARE THERE PRECAUTIONS I CAN TAKE IF I’M STILL NOT CONVINCED?
Yes! Being cautious is healthy. Although it’s considered negligible risk, if you’re still worried about UV exposure, or premature ageing, there are simple solutions you can take to mitigate any effect. Two great options are to use Broad Spectrum Sunscreen and UV Protective Fingerless Gloves.
Apply a Broad Spectrum Sunscreen at least 20minutes before you use the UV lamp and before nail prep. I recommend a minimum 30+SPF, but 15+SPF and upward is fine. It can be a physical or chemical type. Apply it slightly past the wrist or ankle, to cover where the lamp light will reach. Best to avoid applying on the actual nail plate, as we don’t want extra oils or grease on the nails.
Specific UV Protective Fingerless Gloves are an easy option. They’re UV blocking material designed gloves that exposes your finger tips for easy painting. Where SPF indicates Sun Protection Factor with creams, UPF (Ultraviolet Protection Factor) is the rating used for clothing and textiles that protect from the sun. A higher number indicates better protection. Gloves rated UPF 30+ to 50+ would be ideal to look for.
There are Gloves marketed for nails, but you can find them using other names: Sun Protection Gloves, driving gloves, fishing gloves, UV fingerless gloves. Ensure they are Fingerless and UPF rated. (Find them on Amazon, EBay, sun safety stores)
These methods are good measures to take if you are photosensitive or using cosmetics and medications that may make you more sensitive to sunlight (such as retinoids, alpha-hydroxy acid hand cosmetics, certain antibiotics or chemotherapy drugs, etcetera).
CONCLUSION
Quality is another indicator of a UV Lamp’s reliability, and I was pleased that The Spaceship ticks all the boxes that count. It has many features that I consider make a lamp close to perfect. These include an enclosed back (for better bulb placement and light coverage), optimised diode/bulb placement, a reflective and removable base, decent intensity, good weight factor (handy for portability) and small footprint.
In Testing I found all 33 LED’s lit up nicely and cured the PC lacquer perfectly each time. There is slight warmth during use but absolutely no heat spikes at any time, and the automatic sensor registered my hand / foot without issue. The timer ran for 120 seconds / 2 minutes on the dot.
Overall I was thoroughly impressed by The Spaceship. And although I wasn’t sure what to expect, it actually exceeded my initial expectations. Long as this post was, I hope this has been helpful to you. Here’s a video overview of the PC Lamp.
And to end with a space-themed quip: This is one small step for man(i), and one giant leap for man(i)-kind.
And that concludes my super-mega long Detailed Look At The Spaceship (AKA The Picture Curable UV LED Lamp)!
I appreciate and read all the comments, so feel free to leave your thoughts and questions below 
ITEMS FEATURED THIS ARTICLE:
For more info on the Picture Curable System visit the Picture Polish website.
Polishes:
- Picture Curable Frenchie & Glossy – from Picture Polish
Other:
- Picture Curable UV LED Lamp (AKA The Spaceship) – from Picture Polish
Please Subscribe to my YouTube Channel ![]()
Feel free to Add Me to Your Feed on  and Connect / Follow me here:
![]()
![]()
![]()
![]()